Sunday, September 25, 2011

  The Wreath Dilemma

Since we moved into our house, I have been debating on whether 
or not to put up a wreath on the front door. The door has
 a large glass window, so I have always been worried
 about hanging one on one of those over-the-door hanger. 
Then I started thinking that I could hang one to the right of the door
 under the lamp. But, I realized the house numbers were there. 
So, for quite sometime, it was looking like our house 
was going to be unfinished, just plain wreathless. 


A few weeks ago, though, my wreath dilemma got solved!
 I came across this idea on Pintrest from the blog Teach.Craft.Love.


I can't believe I never realized to just put the 
house numbers on the wreath!
Problem Solved.

I quickly got to work on my wreath with help from my friend Laura 
(who recently went into the wreath business - Whimsical Wreath Creations).
 I got all of my supplies from, where else .... Hobby Lobby  (I feel that my 
blog is just an advertisement  for that store, they should start paying me). 


I decided to go with a late summer/fall theme and make the wreath
 simple by just using sunflowers. I just stuck the stems in on the
 left side of the wreath and bent them around until it looked right. 
Some of the little colored balls/fake berries fell off in the process 
so I just stuck them in randomly around the wreath for more color.


Next, I pulled the house numbers off the front of the house
 and I painted them yellow. Then I attached
 them on the right side with clear wire.
I plan on making more house number
 wreaths for each season!!!


Jarrett hung the wreath up for 
me after I had many failed attempts. Apparently
 I put too many nail holes in the house.


Awwww the house feels so much more complete!! And pretty!

~Supplies~
Wreath, flowers,
paint, clear wire,
house numbers
 (from home improvement store) 

~Cost~
Total: $12-15

Wreath - $3
Flowers -$2 a piece
Paint -$2
Wire $2
Numbers - $1 a piece 


Saturday, August 27, 2011

  Put a Belt on Your Head!

Well it's about time that I put up another post!  
As some of you know, I started PA school back up 
again last Monday.  And sadly, I have been going 
through Blog/Hobby Lobby/Estate Sale
 withdrawals all week. But now its Saturday
 and I am a free woman (except for the massive stack of
 homework that I have piled up to get done this weekend).
 So, I went to an estate sale this afternoon and I hit it big! 
They were practically giving stuff away because they were 
closing about 10 minutes after I arrived. I ended 
up with eight wicker baskets, several holiday decorations, 
an old painted coffee can (don't know why I love 
those cans but I do), and a belt all for $6!


In my mad rush to grab everything I could at the sale, 
I noticed the belt I bought and thought that I would use it 
with a blue/turquoise dress I had. 


When I got home I tried the belt on with 
the dress and I loved the belt,
 but not the belt with the dress or with
any other clothing I had. I realized 
that maybe I didn't necessarily need to
 use the belt as a belt.
So, I decided instead I would 
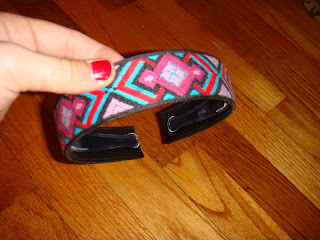
turn it into a headband!  
Here is all it took  ....

All I used was fabric scissors, 
super glue, and an 
old clear headband I had. 
I cut a piece of  the belt to 
fit over the headband. 


Then I put super glue on the back of the belt and glued it 
across the top of the headband.


And, I ended up with a beautiful headband!
 It was that easy!!!


The estate sale today was AWESOME!
I got a lot of good stuff and  love my new 
headband, heck I probably would
 have paid more than $6 for it alone!

~Supplies~
Fabric scissors, belt, 
super glue, old plastic headband

*Cost* 
Practically free!!!

Tuesday, August 16, 2011

  The Traveling Leaf

Several years ago, my Dad was on a trip in Shanghai, China
 and he found this MONSTER of a leaf. For some reason, he
 thought it was so cool that he decided to bring it
 home with him. So he packed up the leaf and flew home,
 half way around world, to Kansas with the
 leaf perfectly intact. Now this is quite impressive
 already, but to make the story even more interesting the 
leaf hung out on a shelf in my Dad's office for several years. 
Then, when my parents moved to their 
new house a few years ago he packed it up again and 
took it with him. And until a few weeks ago the 
"Traveling Leaf" still set undamaged in his
 new office on the same shelf. 

So, I decided it was about time that we were going to 
do something with this crazy leaf. I asked him if I could frame
 it so that we could protect it, but I was really thinking 
that we might finally give this leaf a purpose. 
He agreed and the fun began!

First, we decided to spray it with a sealer 
for protection (after like five years uggghhh).


We then let it dry overnight.


The next day, I came over with a 12"x12" frame 
(that's how big this leaf was!) and some
 scrapbook paper for him to pick from.
He choose to place the leaf on the scrapbook paper
 I had with all of the postage stamps and letter images.
My mom and I thought this was the perfect choice since it
 kinda of incorporated the whole travel story of the leaf.


We simply just attached the scrapbook paper to the frame
 backing, laid the leaf where we wanted it, 
and then added the frame.
It took like 5 minutes or less!
Now it looks great!!


Dad loved the way it turned out and my parents decided they are
 even keeping it in the living room for now on the mantel.
I'm just happy we don't have that dang leaf floating
 all around the place anymore!


~Supplies~
A leaf, spray sealer,
 a piece of scrapbook paper, 
and frame

**Cost**
I just had to buy
 the frame, it was $10
 from Micheal's


Monday, August 15, 2011

  Table Decoupage

Before we moved into our house last July, Jarrett built 
a little table for our kitchen. The plan was to mosaic it 
eventually, but 6 months went by and I still didn't know
 how to mosaic. However, I was learning about the
 wonderful world of decoupage!

Here is the table that I started with. 


Originally, we had gotten little chairs at a garage sale to go with it.
 But when I decided to decoupage it I set out to find some wooden ones
 that I could paint like the table. I found the pair below at a
thrift store for $9 total. I decided to go with a "crackling" technique
when I painted the table and chairs so
 that I would get that aged effect.
Click here to see the crackling process.
I started out with a tan base coat.


After the tan base coat dried, Jarrett and I covered the table
 and chairs with the clear crackle medium and let that dry. 
The next step was to paint the top coat, I picked out a dark purple. 


If you click on the pictures to enlarge them, you will see the
 crackling effect that the medium gave the paint.

After the purple paint dried, all that was left to do was decoupage.
 I decided to put one of my favorite sayings on the table and then 
I cut out the butterflies that were printed on scrapbook paper
 from Hobby Lobby. Once I had all of my lettering and pictures
 cut out, I laid them out in the design I wanted and I started 
gluing them on with Mod Podge decoupage glue. After all 
of the pictures were glued, I covered the entire surface
 of the table and chairs with several layers of the decoupage
 glue (letting the coats dry in between). That is the great part 
about Mod Podge it is a glue and a sealer! 
For better decoupage instructions and some other ideas click here.

Here was the end result! 


I love this table, now it is functional and pretty!!

~Supplies~
Table and Chairs, 
base coat of acrylic paint,
 crackle medium (any kind will work),
top coat of  acrylic paint
 (pick something that 
contrasts well with your base coat), 
decoupage glue, 
scrapbook paper/pictures/fabric etc., 
scissors

**Cost**
about $20 
I got the table for free, chairs for $9,
the acrylic paint comes in $2 bottles
 at Hobby Lobby, 
Crackle Medium was $3 (I think), 
scrapbook paper was $2.

  The Office

Recently, I redid the back bedroom and made it an office.
When we bought the house this room was the same tan color as the 
rest of the house. Originally, I painted it blue. 
But, I changed it to yellow last week. Poor Jarrett, he just 
had to go and  marry a girl who loves changing color (I credit it to my
 childhood in a white-walled house). 
Here is the new office. 


Click here to see this button lamp project

I still have some pictures to hang up in the room, 
but it looks better now than I thought it would have 
when I started. The best part of this room was the
 name of the paint color..... "Pale Butter" or 
as I call it "Pale Butta!"